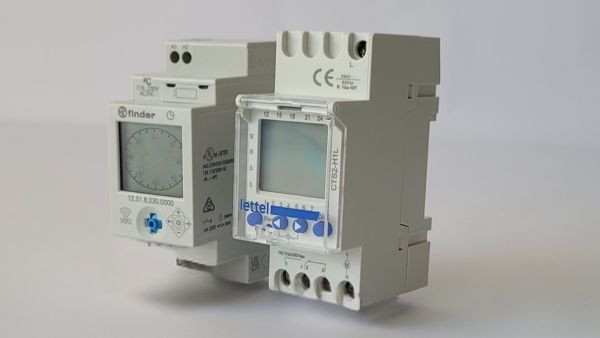
What is a time switch?
Modular time switches, also known as time clocks, are electrical devices that allow you to programme an appliance to switch on or off at specific times. These clocks are often used to make significant energy savings by preventing forgetful switching off.
These clocks are only suitable for circuits or appliances that do not consume more than 1800W (8A amps at 230V).
Read this article to find out how to choose your modular time switch.
How do you plug the time switch into your electrical panel?
Don't worry, installation is very easy and takes just 3 steps:
IMPORTANT:
Before carrying out any work, turn off your main circuit breaker to make sure there is no current in your installation.
If you don't have the skills, contact a professional to modify an electrical installation.
Step 1: INSTALL the modular clock in the electrical panel.
Next, you'll need to identify the location in your electrical panel where you'll install the time switch and its 2A protection circuit breaker.
Locate the phase (red or black wire) and neutral (blue wire) in your panel, and connect the upstream side of the 2A circuit breaker to terminals "L" (red or black) and "N" (blue).
In the same way, run 2 wires from the downstream circuit-breaker to the clock's "L" and "N" terminals, keeping the same color codes for the wires.
Your clock is now connected!
Note: use 1.5 diameter wires for this phase.
Step 2: CONNECT the device to be controlled to the modular clock.
Now locate the power cable for the equipment you wish to control using the clock.
This cable probably consists of 3 wires:
- the phase wire (L), which is red or black
- the neutral wire (N), which is blue
- The ground wire (G), which is GREEN and YELLOW.
For your connection, you don't need to modify the neutral wire (blue) or the ground wire (green and yellow).
Disconnect the circuit's phase wire from its circuit breaker and tune it to the clock contact, then install a new wire between the contact's second terminal and the terminal left free on the circuit breaker.
WARNING: the cross-section (diameter) of the wire you add must be the same as that of the circuit's power cable.
That's it, you've connected your clock, check that all the terminals are tight, put your tools away, clean up a bit and you can turn on the main circuit breaker again.
Step 3: PROGRAM the modular clock.
Scheduling depends on the model of clock you've chosen. Each one comes with instructions that you simply have to follow. Programs can be daily or weekly, or adapted to the sun if you've chosen an astronomical model.
Here are a few examples to help you choose the right clock model:
- Daily clock: electrical appliances such as hot-water tanks or heating systems that need to switch on and off at the same time every day.
- Weekly clock: appliances that are switched on during the week, but need to be switched off at weekends.
- Astronomical clock: outdoor lighting that switches on at sunset and off at sunrise.
On the latest models, you can set your clock using your smartphone, either via USB, WIFI or NFC.


